Photography
Composition in Photography
May 28th
This post includes a few useful links and one video to help you explore one of the most important elements of good photography … composition.
10 Top Photography Composition Rules by PhotographyMad
5 Elements of Composition in Photography by Digital Photography School
5 More Elements of Composition in Photography by Digital Photography School
25 Photo Composition Tips by photofocus
The Rule of Thirds is explained in a bit more detail here:
Rule of Thirds by Digital Photography School
Panning–Capturing A Sense of Sideways Motion
Mar 14th

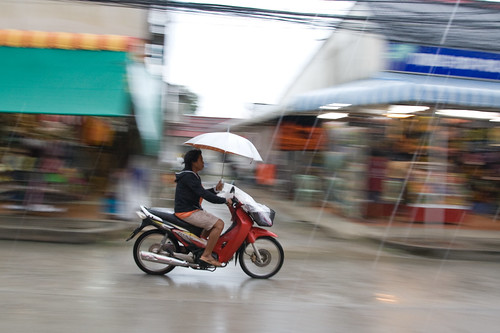
Image: Some rights reserved by zoutedrop
The above photo achieves a nice effect. The subject of the photo is respectably crisp (in focus) but the background is deliberately blurred to give a sense of the movement which is happening here. The techniques used by the photographer is known as panning and you should give it a go.
First, check this video …
Now read up from one or both of these useful sites:
Mastering Panning – Photographing Moving Subjects by Digital Photography School
Mastering the panning technique by Gavin Gough
Exposure and Long Exposure
Feb 21st
The first video summarises the three crucial controls needed to get exposure right – Aperture, Shutter Speed and ISO.
This excellent interactive SLR camera simulator allows you to experiment with these controls on a virtual camera:
This second video sets us an assignment to create long-exposure photography. Here, the photographer uses a classic scenario – moving car lights. (the same technique could be applied to many scenarios where general light conditions are very low but bright lights are moving fast – think of some others for yourself). Notice first that one extra key ‘ingredient’ is needed … a tripod. Notice, too, that this technique involves all three controls (aperture, shutter speed and ISO)
Mastering Light in #Photography 1 – Adjust Your ISO Settings
Jan 24th
If photography is ‘writing with light’, we need to learn how to control the light entering our cameras if we are to take successful shots.
There are three ways of controlling light – adjusting aperture size, shutter speed or ISO settings.
ISO settings refer to the sensitivity of the camera’s sensor to light. The sensor is at the back of the camera, inside the body, where the image is captured electronically. In more traditional cameras, this is where the film would be. In film cameras, we need(ed) to choose the speed (or sensitivity) of film for different light conditions.
Low ISO film and low ISO settings on a digital camera need lots of light to capture the image, but give the sharpest image and richest colours as a result. Think bright sunny days giving vivid and clear images.
High ISO settings work with low light conditions, which is the number one reason to use them, but the quality of the picture can be noticeably degraded compared to those taken with a low ISO number in sufficient light. High ISO images tend to have noticeable ‘noise’ or a graininess which may not be desirable, but still may be preferable to switching on the flash. That said, some photographers actually make deliberate use of the graininess, which can look very striking for example on black and white portraits.
Some modern and more expensive SLR cameras give impressive shots even at very high ISO settings with less noise visible.
The key thing is, you should experiment with your ISO settings to adjust the quality of the image but also to allow you to take pictures in dim light to good effect.
It is the one of the three settings which is often forgotten about, but setting the right ISO allows you more flexibility with aperture and shutter which is why I’d start experimenting with this first.
Resources:
ISO Settings in Digital Photography by Digital Photography School.
Use a High ISO to Create Grainy Shots by Digital Photography School.
ISO by MichaelTheMentor
ISO Basics by ulufilms:
Camera Tutorials – ISO by QQQcon


